Tutorial: Getting Started
Introduction[edit]
Welcome to this beginners tutorial. It is directed towards newbies who have just downloaded OpenMPT and are about to get started with using the program. Read this tutorial to get the hang of this piece of software. In easy steps, you will learn how to load samples and use them to create a simple song. This tutorial will not cover each screen in depth. There are other pages in this manual that do this.
This tutorial will use the song Aryx.s3m as a reference. You can download Aryx at The Mod Archive.
Getting Started[edit]
If you have not even downloaded OpenMPT yet, you should read the System Setup page first for instructions on how to download and install OpenMPT.
Assuming that you did everything on that page, you can now start OpenMPT. If it is the first time that you start the program, the Welcome dialog will pop up. You can configure OpenMPT to your needs in this dialog and the Setup dialog now, or you can do that at a later stage by pressing View → Setup.
Setting up the sound card[edit]
The only important thing right now is to set up the sound card properly. Go to the Sound Card tab of the Setup dialog. Check the available sound devices by pulling down the list. If you have a WASAPI device available, select it (this is the default). If you have professional audio hardware with a dedicated ASIO driver, you may also select that. WASAPI devices usually work fine with a latency of 20-30ms. If using an ASIO or WaveRT driver, you should be able set the latency to less than 10ms without problems. If you use MME (not recommended), try a value between 30-100ms.
The lower this latency is, the better — but setting it too low will result in crackling. The Update Interval should also be as low as possible, to keep the GUI as tightly in sync with the audio as possible.
Setting up the keyboard[edit]
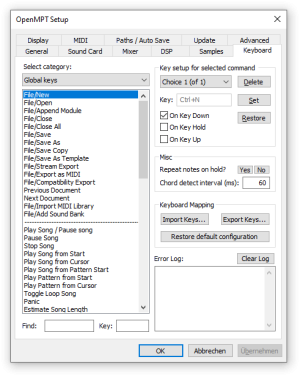
This tutorial references key combinations that are used by the default keyboard configuration of OpenMPT. If available, you might have chosen a language-specific keyboard mapping in the Welcome dialog. Almost all default keyboard configurations are almost identical and are mostly adjusted to fit differening keyboard layouts, though. If some of the keys referenced in this tutorial do not “fit”, you may want to go to the Keyboard Settings and hit the “Restore default configuration” button or look up the correct shortcut there.
When you are done, press OK to close the dialog.
Creating a new song[edit]
In the menu bar, go to the “File” menu, open the sub menu “New” and choose “IT” from the list of offered formats.
Loading drum samples from Aryx[edit]
OpenMPT can handle working on several songs at once. You probably will not want to actually edit two songs at the same time in most situations, but you can view one while working on another. :) We are going to use this principle to load in samples from Aryx, which you should have downloaded from The Mod Archive..
The second icon in the toolbar is the open button. Press this button to open an existing song. Browse to the Aryx song. Note, OpenMPT can load songs inside ZIP archives, and also from RAR, LHA and GZ archives. You must set the file filter to All files to let the ZIP files be shown though… and saving to a ZIP file is not possible. :)
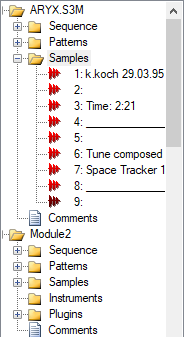
Once you have loaded Aryx, you will see that it appears in the Tree View on the left. It will also be the active song.
- In the tree view, click on the Module 1 folder to jump back to our newly created module.
- Click on the Samples tab.
- In the tree view on your left, locate Aryx again. Do not click on Aryx, but on the little plus sign next to the Samples folder to expand it.
- Drag “3: Time: 2:21” to the big black screen on the right to load that sample.
- Click on the first icon in the toolbar on this screen (New Sample). Drag “6: Tune composed using” to the right to load it too.
- Click on the New Sample button. Drag “5:” to the right to load it as well.
- Click on the New Sample button. Drag “4: ___________________________” to the right to load it too.
When you see these waveforms, note that you can use any key on your keyboard (A-Z) to get sound out of them. This works like a piano. In fact, most keyboard configurations will actually set it as a piano with the white and black keys positioned as that too. The default configuration however allows you to have more notes to work with. Note that when pressing QWERT in that order (AZERT on a French keyboard), the tone pitch raises by semitones. ASDFG does the same but one octave higher, and ZXCVB is the same too but another octave higher.
We have now loaded some basic samples which we can use to make a drum pattern.
Making your first 4/4 drum pattern[edit]
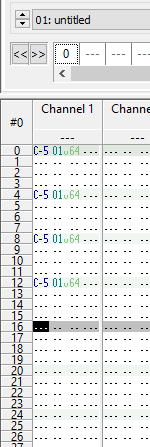
4/4 drum patterns (aka “Four-to-the-Floor”) are common in all kinds of disco and dance music. Really simple stuff so it is great to start with that. First, let us go to the Patterns tab to be able to enter notes.
Since making a beat largely depends on the time signature used, it is nice to actually see the beats in your pattern. If every row in the pattern looks the same to you, row highlighting has probably been turned off. In that case, you can turn it on again in the Display setup. Turn on both “Primary highlight” and “Secondary highlight”.
As you see, every 16th row has a darker colour than every 4th row. These are measures and beats. By default, a pattern has four measures with four beats each. This can be changed, but we are not going to do that now.
- In the toolbar, you see a dropdown list with a spin button on the left side. In this list, you can choose the main instrument that is used for editing. Set this to 01:..., as it can be seen in the screenshot on the right.
- Next to this dropdown list, you see Edit Step. Set this value to 4. It will make the pattern cursor move down by four rows after having entered a note.
- In the toolbar on top (below the menu) there is a field Octave which configures the base octave of your keyboard. By default, this is to 4, so if you have changed it before, set it to 4 again.
- Click on the first row in Channel 1.
- Make sure that the cursor is positioned in the leftmost cell of that channel. This cell is used for entering notes.
- Start tapping A until you have a C-5 01 on row 12.
- Now, select the measure you have just entered using your mouse cursor: Click on the 0 left to the first row of the first pattern and hold the mouse button clicked while you drag the mouse down to the row that has 15 next to it. Release the mouse button and press Ctrl+C (or choose Copy from the Edit menu).
- Move the cursor to the leftmost column of the row that has 16 next to it. Right-click on that position, choose Paste Special from the menu, and in the now opening sub menu, choose Paste Flood. Great, now the whole pattern is filled with a 4/4 beat! Using Paste Flood, you can quickly create beats and other song structures that do not change a lot.
- Press F6 to play your first pattern.
At any time, you can press F8 to stop the sound, so you can continue to work. Now would be a good time to press F8. :)
Adding percussion to your rhythm[edit]
Of course this simple 4/4 drum beat is not enough. Let us add some Hi-Hats in between.
- Start by selecting instrument 04 from the main instrument panel above.
- Scroll up so you can see row 0 again.
- Select the first cell in channel 2, row 2.
- Start tapping Z until you have a C-6 04 on row 62. Again, you can speed up this process by using Paste Flood if you want.
- Press F6 to audit the result.
- Set the Edit Step to 1 using the toolbar above.
- Select the cell in channel 2 on row 29 and press Z to enter a note.
- Scroll down, select the cell: channel 2, row 61 and enter a note there too.
- Note how the cursor automatically moves to row 62. Press Delete to remove the note.
- If the instrument number next to the note is still there (this depends on the keymap you use), move the cursor to the instrument column and press delete again to also remove the 04.
- Move left again, and one down to row 63 and press Z to enter a note.
- Press F6 to audit the result.
Adding a snare to give it even more depth[edit]
- Select Instrument 2 from the main instrument panel above.
- Set Edit Step to 8.
- Select the first cell of channel 3, row 4.
- Start tapping Z until you have a C-6 02 on row 60.
- Press F6 to hear the result.
A hint in between[edit]
You have now succesfully created a drum loop. Before you continue, note how we made use of every fourth line for the beat to emphasize it, and every second line after to get a balanced feeling. Also note how between lines 29 and 31 and 61 and 63 we used the other two lines to make it out of balance to get a nice variation. You will learn how this works automatically by making (and listening to) more music, though it will probably not happen within a week, maybe not even in a month. To start with, you should therefore experiment with different settings and see if you can create different kind of drum loops. Often, you can make a beat sound more interesting by delaying or pushing up some notes by a line every now and then.
This however just takes time, so do not worry and let us continue to the next part of this tutorial.
Adding a Bassline[edit]
Before I just tell you what notes to enter, I would like to explain a bit how basslines work. A bassline is not just a melody played on a lower octave with a bass instrument. A bassline actually forms part of the rhythm. The bassline usually sets the base note for your rhythm. The bass section in a song can be seen as part of the background. Although it is strong and present, it usually does not play a melody of its own. In certain musical styles, it can be done to play a repetitive melody so that you get more groove.
Okay, so let us add that bassline to our track! To start, we will need a sound for our bass.
Select the sample tab and create a new sample (first button in the sample toolbar). From the treeview, drag in sample 8: ___________________________ from Aryx to your sample window. This will be our bass sound. Before we enter our bassline, let us play the pattern one more time by pressing the play button on the main toolbar (below the menu) to get some ideas on what to enter, and stop playback once you get an idea. As this is a tutorial, I do not expect you to actually get ideas yet, but at least you now know a way to look for inspiration. :)
Entering a simple bassline[edit]
Go back to the pattern screen and select sample 5 from the toolbar if that has not been set yet.
Go to the first cell of channel 4, row 0, and press E, which will put in a D-4 05. Play the pattern to hear the result. As you can hear, the sound is there, but it certainly is not a bass sound. It is too high for that. We will need to adjust the octave in order to get the right range of notes. In the main tool bar, there is an Octave setting. Set it to 3 using the arrow buttons next to it.
Again, go to the first cell in channel 4, row 0 and press E to enter a D-3. Play it again to hear the difference. Note that pressing a number between 0 and 9 while having the cursor on a note is also a quick way to change the octave of an existing note, but doing this for every note can be quite tiresome. Let us make the bassline more fancy. Remain in channel 4 and press the following keys in the following rows:
- Row 16: Press Y
- Row 32: Press Q
- Row 48: Press I
And play your pattern.
We have just created a really simple bassline, but frankly, it sounds rather dull at the moment. Let us make it a bit better by adding silence.
Enter the following notes:
- Row 8: Press the key left to the 1 key to put a Stop note (“^^”) in the pattern. On US keyboards, this key is labelled ~ and will from now on be referenced as such.
- Row 24: press ~
- Row 40: press ~
- Row 56: press ~
Press F6 to hear the results.
Entering a more complex bassline[edit]
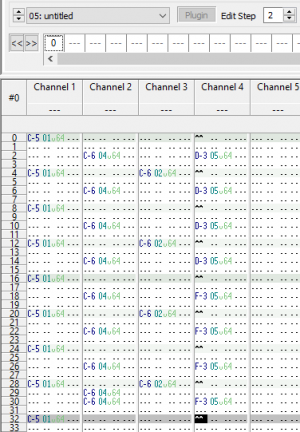
Okay, so this is indeed a better bassline, but you will probably be like: “But how about those fancy dance basslines?” Sure, We will make one. To start, remove the notes in channel 4 first. Make sure that you are in channel 4, and hit Ctrl-L. This will make a selection in that column. If you accidentally hit Ctrl-L again, it will select the entire pattern. Hit it again to select just one channel. Press Delete to delete the content.
Go back to row 0. At this time, we are going to make it easy for us. Set the Edit Step to 2, and repeat the following four times:
- Press ~
- Press E
Then do the following 4 times:
- Press ~
- Press Y
Do the same 4 times with Q and I.
If you have done it right, you should have this nice dancy bassline, so go ahead, play your pattern to find out.
Creating your first sample[edit]
Sometimes, you need a sample with a very basic waveform, or you have to fix the waveform of an existing sample (probably because it contains unwanted “clicks”). For these purposes, OpenMPT offers a sample drawing functionality, which is especially popular among chiptune artists. With this feature, you can easily create small chiptune samples within seconds. So let’s try this!

Go to the Sample tab and, as always, create a new sample slot by pressing the upper-left button in the sample editor. This time, we will not drag an existing sample into the sample editor, but rather create our own. To do this, click the yellow icon next to the pencil icon, right above the sample view (which is still completely blank). You are asked to enter a sample length; in this case we choose a length of 173 sampling points. Press OK to confirm the choice — you now have an empty sample!
Now you can start doodling around in the sample view by pressing the pencil icon. Draw a straight line that goes from the lower-left to the upper-right corner. Press the note icon (next to the sample name) to preview your sample. Keep doodling around by drawing other kinds of lines until you like the result. Press the note icon again to stop playback and the pencil icon to disable sample drawing.

Next up, we are going to modify the middle-C frequency of this sample, so that it is tune with the bass sample. To accomplish this, locate the “Freq. (Hz)” in the upper half of the sample editor and enter 44125 in the box next to it. This is the playback frequency at middle-C (C-5).

Since we are using a very short sample (a “chip” sample), the perceived pitch of the sample does not only depend on the middle-C frequency, but also the loop length of the sample. Go back to sample 5. Play it, and you will notice that it does not have quite the same pitch as sample 6, even though they have the same middle-C frequency. To fix this, go back to sample 6 and enter 7 in the “Start” box in the “Loop” section. Now the sample’s loop is exactly as long as the bass sample’s loop and thus they have the same pitch.
Adding a Melody[edit]
Basically this is the same as adding a bassline, except that you will be focussing on that what plays in the foreground.
The melody is something that can continuously change throughout the entire track, or can be a repetition with certain variations. In order to know what types of melodies there are, listen to music, focus on the melodies and start noticing. :)
But at this stage, we just want to add a melody to our tutorial song. Go back to the pattern editor and let us enter a simple melody. Select Sample 6 from the toolbar for that.
Assuming that you still have the Edit Step set to 2, go to channel 5 row 0, and enter the following notes:
C, ~, B, N, ~
Then go to row 24 and enter the following notes:
<, ~, N, ~, Z, ~, C, B, ~
Then go to row 56 and enter the following notes:
N, ~, B, ~
You now have created a basic melody.
Adding depth to your melody to make it cool![edit]
Yes, I have to admit, the melody is a bit dry like this. So let us put an echo on it. There are several ways to do it actually. You could program the echo in the patterns or you could use a sound processing plugin.
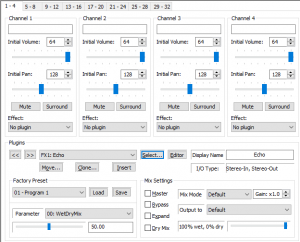
Here, we will actually discover both possibilites to learn about various techniques.
First, we start with the easier solution (although I prefer the second solution).
Adding an echo using a plugin[edit]
- Go to the General tab.
- In the lower third of the tab, you see the plugin configuration area. There is a dropdown list which reads “FX1: undefined”.
- Next to that list, click the Select button.
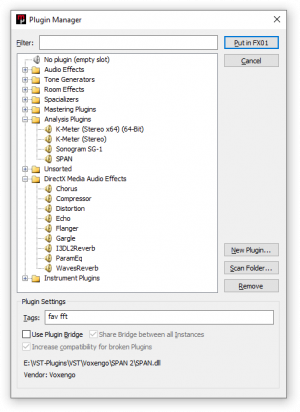
- Expand the DirectX Media Audio Effects folder.
- Double-click Echo.
“FX1: undefined” has now changed to “FX1: Echo”, and this plugin slot contains an instance of the built-in Echo plugin. Let us add it to our lead melody to hear its effect.
- Above the plugin configuration area, you can find the channel settings. At the top of this area, there are tabs labelled “1 - 4”, “5 - 8”, and so on. As our melody is in channel 5, we select the 5 - 8 tab.
- Below Channel 5, there is a dropdown list labelled Effect. In that list, select FX1: Echo.
- If you play your song now, it sounds surprisingly nice already, but we are going to make it sound even nicer.
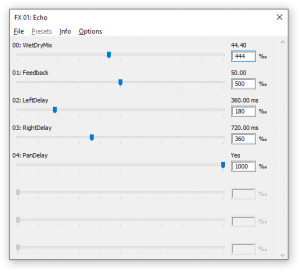
- In the plugin configuration area, press the Edit button next to the Select button we pressed earlier.
- Set the WetDryMix parameter to 44.40, by entering 444 in the edit box next to the corresponding slider.
- Set the Feedback to 50.00 (enter 500 in the edit box).
- Set the LeftDelay to 360.82 (enter 180)
- Set the RightDelay to 720.64 (enter 360) — Notice that the right delay is twice as long as the left delay.
- Set the PanDelay to Yes (drag the slider way to the right).
And there we go, a nice echo on the lead!
Adding an echo using pattern programming[edit]
First, we remove the echo from the previous step again.
- Go back to the General Tab if you have left it in the meanwhile.
- In the plugin area, check the Bypass checkbox, so that our echo effect will not be processed anymore.
If you want, you can also remove the echo effect completely by clicking the Select button and choosing No plugin from the plugin list.
Now, go back to the pattern editor.
- Put your cursor on channel 5 and press Ctrl-L, Ctrl-C.
- Go to channel 6, or press Tab to go to the next channel. Go back to row 0, by pressing Ctrl+Home and press Ctrl-V.
An exact copy of your channel has been made. That is of course not an echo yet.
- Press Insert 3 times.
- Press Ctrl-L and then Ctrl-M.
- Enter Amplify by 50%.
- Repeat the above steps for Channel 7, so Ctrl-C, Tab, Ctrl-V, 3x Insert, Ctrl-L, Ctrl-M, 50%.
- Repeat the above steps for Channel 8.
If done correctly, the notes in channel 8 have a v08 next to them. This means that play at a volume of 8, which is quite soft (the maximum volume is 64).
Note: We have duplicated the channel using the Copy and Paste mechanism. Of course this would be quite tiresome if we want to duplicate a channel that contains some note data on several patterns already. For that reason, you can also use the Duplicate Channel menu item from the channel header’s context menu to speed this process up.
Working with the order list[edit]
Now you know how to fill a pattern with notes so you can create some music. Let me explain how to create different patterns and play them as a song.
Directly above the pattern view, you can see a big horizontal bar with squares in it. The first square is filled with 0, the rest with ---. This is the order list. It dictates in which order the different patterns are played. So far, only pattern 0 (the first pattern) is played at all, as we do not have any other patterns yet.
Every number in the order list references a pattern. In the pattern editor, you can see the number of each pattern in the top left corner, above the row numbers. At the moment, it should say #0. Note that you can click this number to bring up the Pattern Properties dialog which you can use to change the length of the pattern, i.e. how many rows the current pattern contains.
- Back to the order list. Right-click the 0 and select Duplicate Pattern from the context menu.
- Go back to the pattern editor and use the mouse to make a selection from channel 4, row 0 to channel 8, row 63.
- Press Ctrl-Q 5 times. Now you have transposed the notes in those channels, which is one way to alter patterns.
You can also remove and / or add notes to change the pattern. Here, creativity is your key.
In the orderlist, you can also right-click a pattern and select Insert Pattern to make a new order with the same pattern. That way, when you play your song, it will have the same patterns played twice. Note that if you edit the first occurrence of a pattern, it will change all patterns with the same number.
Now, select pattern 0 from the order list, right-click it, and select Insert Pattern. Now you should have an order list that contains pattern 0 twice and after that pattern 1. Now, do the same for pattern 1, so that the order list reads 0-0-1-1.
Now we want to listen to our song. In the main toolbar below the main menu, click the play button. Now you can watch how the patterns play by checking the Follow Song checkbox.
You can go on building your song from here. When you right-click an order list item, you can also choose Create New Pattern. This creates a new, completely empty pattern. Sometimes, this is useful if you have made a transition and want to start with completely something new.
Keeping your order list tidy[edit]

A neat trick to keep the order list tidy is to add separator (+++) patterns. You can think of them as markers that do not contain an actual pattern but are being skipped. It is common to add a separator pattern after each four patterns, as that fits with most song structures. To insert a separator pattern, click on an empty pattern (---) and press the Minus key once. If you want to add a separator pattern between two existing patterns, you can simply click on the pattern after which the separator should be added and press I. As with many other things in OpenMPT, there are mutiple ways to do the same thing. :)
It is also worth knowing that you can select a range of patterns to insert or duplicate. Simply click on the first pattern that you want to insert / duplicate and Shift-click the last pattern. Now you can drag multiple patterns at the same time, duplicate them, etc...
Using Find / Replace[edit]
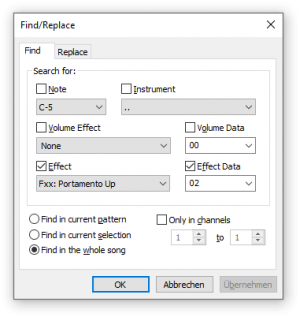
Let’s say you’ve been making your song now for quite a while. Maybe you want to replace an instrument with another one, or you entered a wrong effect and need to change it. You could do this by manually going through each and every pattern, but there is a more efficient method available: Find / Replace.
Accessing Find / Replace[edit]
You can access the Find / Replace through “Edit” in the main menu bar by choosing “Find / Replace”, or through a hotkey, the default being Ctrl+F. If you already have a search set up, you can select “Find Next” or its hotkey, the default being F3, to cycle through each occurrence all the to the end of the module. Otherwise, the Find / Replace menu will appear.
Setting up a Search[edit]
With the Find / Replace menu open, select the Find tab. This is where you will set up your search parameters and what to look for in the module. There is a fairly comprehensive list of options available. Click the checkbox next to each option to have the search look for it. If multiple checkboxes are enabled, all criteria must be met for a term to be found.
You can have the search only look in the current pattern, the entire song, or if you have a selection highlighted, your selection. You can also click the checkbox for “Only Certain Channels” to have the search only consider the channels in the range allotted (inclusive).
For our tutorial module, we want to transpose the melody to sound an octave higher:
- Press Ctrl+F to open up the Find / Replace dialog.
- Select from the “Instrument” dropdown menu instrument 006. The “Instrument” checkbox will be checked automatically.
- At the bottom, select “Find in the whole song”
- Switch to the “Replace” tab at the top.
- Check the “Note” box, and select “+1 oct” from the dropdown menu.
- Make sure that “Replace All (no confirmation)” is checked, and hit OK.
Now all of the melody, which is sample number 6, will sound 1 octave higher than it did before. If this is too high and you want to back to how it was, you can repeat the above steps and select “-1 oct” instead of “+1 oct”. Alternatively, you can undo the whole replacement by using the “Undo” functionality in the “Edit” menu.
Looking for Inspiration[edit]
Just like with most things, the art of tracking requires time and effort in order to be mastered. To see good examples of what can be done in OpenMPT, open “Help” in the main menu bar, and then select a module from the “Example Modules” list to open it. Each of these modules are by a listed author and with their own title, all in OpenMPT's ‘MPTM’ Module Format. It is encouraged to look through all of these modules to see a variety of styles and genres that can be done in OpenMPT, and you may even pick up a few good habits and knowledge from closely studying them. The modules usually have comments that will provide helpful advice as well, so do not skimp on reading them. If you are just beginning your tracking journey, don't immediately expect to reach the quality of these modules, as great accomplishment comes from great practice first and foremost.
That’s all, folks![edit]
That’s it for now. If you have any questions, feel free to ask them at our forums.
If you want to see the tutorial song as it should be if you have done everything as described above, you may download it.