Manual: Samples

On the sample tab, you find all the tools needed to load, edit and create new samples or OPL instruments. Samples, besides synthesizer plugins, are the main sound source in OpenMPT. Depending on the module format used, they are directly used without further layers on top (MOD and S3M format) or are referenced by instruments, where their playback can be altered through a variety of envelopes and other effects (all other formats).
In the S3M and MPTM formats, a sample slot can also hold the patch data for an FM-synthesized OPL instrument.
A number of sample properties can be controlled on this tab, such as default volume and panning, loop and sustain points as well as auto vibrato. All options are explained in detail here.
Toolbar[edit]
File Toolbar[edit]
![]()
- New Sample: Creates a new sample. In instrument mode, you are asked if the new sample should be assigned with a new instrument. Shift-clicking this button or choosing the dropdown menu duplicates the current sample. In the S3M and MPTM format, the dropdown menu can also be used to initialize the current sample slot with an FM-synthesized instrument.
- Load Sample: Loads one or more sample in one of the following formats. To enforce loading as a Raw sample, choose “Import Raw Sample” from the dropdown menu.
- Amiga IFF (8SVX / 16SVX / MAUD)
- AIFF / AIFF-C with uncompressed PCM, floating-point, µ-Law and A-Law (AIF / AIFF)
- Sun Audio with uncompressed PCM, floating-point, µ-Law and A-Law (AU / SND)
- SNES Bit Rate Reduction (BRR)
- Apple CAF: Uncompressed PCM (CAF)
- FLAC, OggFlac (FLAC in Ogg Container)
- Impulse Tracker samples (ITS)
- MPEG-1 Audio (MP1 / MP2 / MP3)
- Opus (OPUS)
- Ogg Vorbis (OGG, OGA)
- Gravis UltraSound patches (PAT)
- Headerless PCM data (RAW, PCM)
- Scream Tracker 3 samples and OPL instruments (S3I)
- OPL2 instruments (SBI)
- Sony Wave64: Uncompressed PCM (W64)
- WAV: Uncompressed PCM (up to 32 bits), floating-point (32 / 64 bits), IMA ADPCM, µ-Law and A-Law.
- Fasttracker 2 instruments (XI)
- Media Foundation: OpenMPT makes use of the Media Foundation framework and can load any sample supported by the system. This includes AAC and MP4 audio, compressed WAV files, WMA, audio streams from video files and other formats.
- Trying to load any module as a sample will open it in the Instrument Library instead, from where you can drag and drop samples into the sample editor.
- Save Sample: Saves an instrument either in the WAV, FLAC, IFF, S3I or RAW format. Hold Shift while clicking the button to mass-export all samples at once. In the save dialog, you can then use the variables
%sample_number%,%sample_filename%and%sample_name%.
Loading a sample file in an unrecognized sample format, or when using the “Import Raw Sample” option opens the Raw Sample Import dialog, where the imported sample format can be specified.
Next to the toolbar buttons are a spin button for dialling up a different sample, a drop-down box for changing the zoom level and sample format information.
Edit Toolbar[edit]
![]()
The sample format block is followed by another toolbar that mostly contains tools for editing samples:
- Preview Sample: Plays the current sample at middle-C. Clicking the button again stops the sample.
- Normalize: Amplifies the sample (or a selection of it) as much as possible without distortion. Samples should be normalized before being converted to 8-Bit for optimal usage of the dynamic range. Shift-clicking this button normalizes all samples independently.
- Amplify: Opens the Amplify dialog, where the sample (or a selection of it) can be faded in or out and amplified by an arbitrary amount.
- Remove DC Offset: Normalizes and shifts the waveform so that it is centered around the center (DC) line. Any DC bias on samples should be removed for optimal headroom usage. Shift-clicking this button removes DC Offset from all samples.
- Change Stereo Separation: Allows to widen or reduce a stereo sample’s stereo width, or to swap stereo channels by entering a negative separation amount (-100%: swaps channels, no change in stereo width).
- Resample: Opens the Resample dialog which can be used to change the sample’s playback frequency. Shift-clicking this button resamples all samples.
- Reverse: Reverses the sample or parts of it.
- Silence: Silences a sample selection.
- Invert Phase: Inverts the sample’s or sample selection’s phase.
- Sign / Unsign: Applies a theoretical conversion between signed and unsigned PCM data to the sample or a selection. Usually this would be used for fixing imported RAW samples with mixed up signed / unsigned import options, but it can also produce nifty-sounding distorted samples.
- Crossfade: Opens the Sample Crossfader dialog, which applies a crossfade between the sample loop start and loop end for seamless sample loops.
- Tune sample: Opens the Sample Tuner dialog, where a sample can be tuned to a given note.
External Samples[edit]
In the MPTM format, you may keep references to external samples instead of directly storing them in the module file. This can help reducing disk space taken up by your modules, especially if you want to keep several work-in-progress versions of your song or when using auto save. However, keep in mind that editing these external sample files will also change any module referencing them.
You can enable this feature by checking the Keep Sample Data on Disk box. This is only available if OpenMPT knows the sample’s location on disk, e.g. after you loaded this sample from or saved the sample to disk during the current editing session. Shift-clicking the box will enable or disable it for all samples where it is applicable. OpenMPT will only load the external sample’s waveform from disk; any other parameters such as loop points, vibrato and panning settings are stored in the module itself.
The Tree View offers further facilities for external sample management: There, you can right-click any sample and set its external path (this will also reload the sample from that location), save any changes you made to the sample to the external file and reload the sample from disk in case you edited it in an external application. You can also reload edited samples that way even when not using the external samples functionality.
Volume, Panning and Pitch[edit]
- Default Volume: The note velocity that is applied if no volume command is found next to a note. It can be overridden by placing a volume command (vxx in the volume column, or Cxx in the effect column in the MOD format) next to the note. Enabling Show default volume commands in the General settings displays the default volume next to a note if there are no regular volume commands.
- Global Volume: The overall attenuation of the sample. At a global volume of 64, no attenuation is done, at 32 the sample is half as loud, etc.
- Set Pan: Sets the default panning of the sample, which can be overridden by pattern panning commands. If enabled, sample panning overrides the default channel panning and instrument panning. In the XM format, every sample is forced to have a default panning, so there is no channel panning or instrument panning.
In the S3M, IT and MPTM format, you can directly define the playback frequency of the Middle-C:
- Frequency: Defines the playback frequency of C-5.
- Transpose: Shows to which note the C-5 frequency is relative to. It can be used to quickly tune the sample to a different note. When changing the transpose value, the frequency is updated instantly.
In the MOD and XM format, you get different options:
- Finetune: Specifies a slight variation (up to a few hundred Hz) from the Transpose note. Units are 1/8 semitone in MOD format, and are 1/128 semitone in XM format.
- Transpose: Shows to which note the C-5 frequency is relative to. In the MOD format, this value is locked to C-5, i.e. the Middle-C frequency cannot be changed coarsely, only fine-tuning is possible. Higher notes in this drop-down box represent a higher Middle-C frequency, i.e. C#5 means that it is transposed up by a semitone.
Sample Loops[edit]
Depending on the module format used, samples can have “normal” and sustain loops. Every loop has a Start and End point, and there are several loop types available:
- Off: The loop is not activated.
- On: The loop is repeated from the start to the end.
- Bidi: The loop is played bi-directionally, i.e. it is first played from start to end, then reversed from end to start.
Sustain loops are played as long as no Note Off event is encountered. They are always considered before normal loops, so if the sustain loop is placed beyond the normal loop, the normal loop is ignored at first. As soon as the sustain loop is exited (by means of a Note Off event), playback is resumed in the normal loop.
By default, pressing the spin buttons next to the loop start and end points tries to move the loop point in a way that avoids „clicks“ in the loop. If no such point is found, the loop point will not change. Holding Shift while pressing the spin buttons changes this behaviour to always increment or decrement the loop point by 1.
Holding Ctrl while pressing the spin buttons next to the loop start and end points moves both points at the same time, so the loop length remains the same.
Note that sample loops have a peculiar behaviour if the ProTracker one-shot loops compatibility setting is enabled in the MOD format: If the loop start is set to 0, the complete sample is played first, after which it restarts and only the loop part is repeated. Since many MOD players do not support this ProTracker quirk, it is recommended to always trim samples (so that there is no more sample data after the loop end) or not start the sample loop at 0.
Auto Vibrato[edit]
OpenMPT’s sample player has an internal oscillator which can be applied to pitch, creating an automatic vibrato effect. Depending on the format, each sample (IT / MPTM) or instrument (XM) can have its own Auto Vibrato settings. In the XM format, all samples that are assigned to the same instrument will share the same vibrato settings.
Auto Vibrato can be combined with vibrato effects in the pattern editor — they both function independently. The Auto Vibrato settings cannot be changed in the patterns, though, so the only way to change the Auto Vibrato amount for a sample is to duplicate it.
The Auto Vibrato is defined by the four following attributes:
- Vibrato Waveform: In this field, you can select the oscillator waveform, i.e. the waveform that is used to modulate the sample pitch.
- Vibrato Depth: Defines how “deep” the vibrato is, in 1⁄64ths of a semitone. The higher the value is, the more the sample pitch is changed.
- Vibrato Sweep: Defines how fast the vibrato reaches the full oscillation depth. The behaviour of this setting is inverse in the XM and IT track formats:
- IT: Full vibrato depth is reached after fading in for
(depth × 256 / sweep)ticks, so the higher the value, the quicker the vibrato fades in. 0 means no vibrato at all, 255 means that the full depth is reached after approximately “depth” ticks. - XM: Full vibrato depth is reached after fading in for “sweep” ticks, so the higher the value, the slower the vibrato fades in.
- IT: Full vibrato depth is reached after fading in for
- Vibrato Rate: The rate (or speed) at which the vibrato will be played. One oscillator cycle has
256 / rateticks, so a higher value implies a faster vibrato effect.
Pitch Shifting and Time Stretching[edit]
Pitch Shifting and Time Stretching can be used to alter a sample’s pitch without affecting playback speed and to change a sample’s length without altering its pitch. By default,
- Pitch: The amount of semitones the sample should be shifted upwards or downwards. Custom amounts can be entered, including fractional numbers.
- Stretch: How much the sample is stretched. Values below 100% increase the speed, values above 100% decrease it.
- Lo-Fi Mode: By default, OpenMPT uses a high-quality pitch shift and time stretch algorithm. When checking lo-fi mode, a lower-quality algorithm similar to that found in old hardware samplers is used instead. This mode splits the sample into many equally-sized grains and cross-fades between them.
- Grain Size: In lo-fi mode, this allows to change the size of individual grains. Smaller values avoid the impression of repeating transient sounds, but also sound more metallic. Larger values sound less metallic, but repetitions between individual grains become more obvious. The optimal grain size differs from sample to sample.
- Ratio Calculator: Clicking this buttom opens the Time Stretch Calculator dialog, where you can calculate the correct time stretch ratio for a given tempo and pattern setup.
- Process: Applies the chosen settings to the current sample.
Sample Display[edit]
Sample Display Toolbar[edit]
![]()
- Zoom In / Zoom Out: Increases or decreases sample zoom. You can also press Ctrl while scrolling the Mouse Wheel to achieve the same effect.
- Toggle Draw Mode: Enables or disables sample drawing which can be used to fix small mistakes in the sample waveform or to create chip samples. Hold down Shift while drawing to draw horizontal lines.
- Resize Sample: Changes the length of the sample by either adding silence at the start or end or by resizing it to a given length. This can also be used to create new samples for chip samples if there is no sample yet, or to initialize the sample slot with an FM-synthesized instrument in the S3M and MPTM format.
- Sample Grid Size: Enables a sample grid which restricts sample selections to equal-sized sample portions. Set the sample grid size to 0 to disable the sample grid again.
Sample Display[edit]
Below the toolbar, the actual sample is displayed. By dragging the mouse, a sample selection can be made. Once a selection has been made, it can be finetuned by dragging its start and end points. Shift-clicking a point can be used to draw a sample selection from a previously clicked point to that point. Ctrl-clicking a point plays the sample from that position at the Middle-C frequency. If the sample has any cue points set, they can (by default) be previewed using Shift+1 through Shift+9.
Above the sample display is a timeline which can be used for orientation. The timeline shows various arrows (yellow arrows for cue points, green arrows for regular sample loop points and cyan arrows for sustain loop points) which can be dragged using the mouse. Holding Shift while dragging allows to place the item more accurately. Holding Ctrl while dragging loop points moves the other loop point as well, so the loop length remains the same. Right-click the timeline to change the unit used for display or insert a new cue point (if any unused cue points are available). Right-clicking a cue point allows you to delete that cue point. Double-clicking a timeline item opens a dialog where a new position for this item can be typed in.
In the status bar, some information about the sampling point below the mouse cursor and (if existing) the current sample selection:
- If no selection is made, the focussed sampling point is displayed and its position is translated into an Offset pattern effect.
- If a selection is made, the selection’s start and end point and the selection length (both in samples and in seconds, based on the Middle-C frequency, as well as in beats based on the current tempo) are displayed in addition to the current position of the mouse cursor in the sample.
Right-clicking the sample waveform opens the context menu.
Sample Display Context Menu[edit]
The sample display’s context menu contents differ depending on whether or not there is a selected block of data.


- Zoom: Zooms into the current sample selection.
- Set as Loop: When a selection is made, this sets the start and end points of the Sample Loop to that of the selection block.
- Set Loop Start: Uses the selected sample point as the start of the Sample Loop.
- Set Loop End: Uses the selected sample point as the end of the Sample Loop.
- Convert to Unidirectional Loop: Only shown when the sample loop is currently a bidi loop, this converts the loop to a normal loop by inserting a reversed copy of the sample data at the loop end.
- Convert to Sustain Loop: Turns the Sample Loop into a Sustain Loop. If both loops are enabled, their start point, end point and type are swapped.
- Set as Sustain Loop: When a selection is made, this sets the start and end points of the Sustain Loop to that of the selection block.
- Set Sustain Start: Uses the selected point as the start of the Sustain Loop.
- Set Sustain End: Uses the selected sample point as the end of the Sustain Loop.
- Convert to Unidirectional Sustain Loop: Only shown when the sustain loop is currently a bidi loop, this converts the loop to a normal loop by inserting a reversed copy of the sample data at the sustain loop end.
- Convert to Normal Loop: Turns the Sustain Loop into a Sample Loop. If both loops are enabled, their start point, end point and type are swapped.
- Set Sample Cue To: Sets one of the sample cues for the MPTM format’s o volume column command to the selected sample point.
- Slice at cue points: The cue points found in the sub menu of the previous menu entry are used as splitting positions to create several smaller samples.
- Slice at grid: If the sample grid has been enabled, this menu item is available to split the sample into several smaller samples at the grid lines.
- Convert to 8-Bit: The sample’s bit depth is reduced to 8-Bit, reducing its sound quality in exchange for a smaller sample size.
- Convert to 16-Bit: The sample’s bit depth is increased to 16-Bit. This should only be done if you want to further manipulate the sample (e.g. resample or time-stretch), as the conversion process itself will not improve sample quality.
- Convert to Mono: Offers the following options to convert a stereo sample into a mono sample:
- Mix Channels: Mixes the left and right channels of a stereo sample equally together.
- Only Left: Only keeps the left channel of a stereo sample.
- Only Right: Only keeps the right channel of a stereo sample.
- Split Sample: Create two sample slots for this sample, one containing only the left channel and the other containing just the right channel. If the sample is referenced by an instrument, this is instrument is duplicated as well for the right channel.
- Trim: Deletes all sample data outside of the selected region.
- Trim around Loop Points: Deletes all sample data outside of the sample loop. This is only available if no selection has been made.
- Quick Fade: If the selection includes the beginning of the waveform, this applies a fade-in from the first sample point to the last one in the selected region. If the selected region includes the end of the waveform, then a fade-out from the first sample point of the selection to the last one is applied.
- Cut: Performs a Copy command, then removes the selected sample data.
- Copy: Copies the selected part of the sample (or the whole sample if there is no selection) to the clipboard. You can then paste this sample data into another sample slot; some third-party applications (including some sample editors) can also make use of this clipboard data.
- Paste (Replace): Replaces the entire sample with the sample data in the clipboard.
- Paste (Insert): Inserts the sample data in the clipboard into the existing sample. If a selection is made, the selection is replaced by the inserted sample. Otherwise, the sample is inserted at the selected position.
- Mix Paste: Mixes an existing source sample with the sample data in the clipboard.
- Undo: Reverts to the previous waveform data (before the last edit).
- Redo: Reapplies the last undone action.
OPL instrument display[edit]

In the S3M and MPTM format, it is possible to use simple FM (Frequency Modulation) instruments in addition to samples. This is achieved with a built-in emulator of the Yamaha YMF262 (also known as OPL3) chip. It offers a limited subset of the features of the well-known Yamaha DX7 synthesizer. In OpenMPT you can use:
- Two operators per voice, either in parallel (additive synthesis) or serially (frequency modulation).
- 8 different waveforms per operator
- Up to 18 simultaneous voices
- Limited panning (left, center and right)
Operation Modes[edit]
OpenMPT supports both additive and frequency modulation synthesis operation modes:
-
 Additive Synthesis
 -
 FM Synthesis


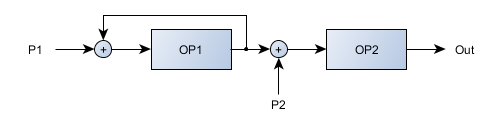
In additive mode, both operators function independently and are simply added together. They behave identically, except for the additional possibility to use modulation feedback on the second operator (named “Modulator” in the editor).
In FM synthesis mode, the output from the first operator (Modulator) is sent to the input of the second operator (Carrier) and is used to modulate the frequency of the second operator. In other words, the waveform that is output by the Modulator applies a (very fast) pitch envelope for the Carrier. The Modulator can be understood as an equivalent to the filter in an analog synthesizer — the louder the Modulator, the more open the filter is.
Operator Structure[edit]
Each operator consists of an ADSR volume envelope, several frequency-related settings and a waveform. In FM synthesis mode, the volume of the Modulator is to be understood as the modulation depth — the higher the volume, the more it affects the pitch of the Carrier.
Volume[edit]
- Attack Rate: Specifies how fast the volume envelope fades in from silence to peak volume.
- Decay Rate: Specifies how fast the volume envelope reaches the sustain volume after peaking.
- Sustain Level: Specifies at which level the volume envelope is held before it is released.
- Release Rate: Specifies how fast the volume envelope fades out from the sustain level.
- Sustain Sound: If enabled, the volume envelope stays at the sustain stage and does not enter the release stage of the envelope until a note-off event is encountered. Otherwise, it directly advances from the decay stage to the release stage without waiting for a note-off event.
- Volume: The overall volume of the operator.
- Tremolo: If enabled, adds a tremolo effect with a depth of 1dB.
Pattern volume commands scale the operators’s volume envelope. In additive mode, volume commands affect the volume of both operators. In FM synthesis mode, volume commands only affect the volume of the Carrier, while filter cutoff commands (using instrument filter envelopes or MIDI Macros) affect the volume of the Modulator.
In contrast to samples, the volume of the OPL emulator is logarithmic. Reducing the volume by 8 units halves it, so e.g. a v50 volume command is half as loud as a v58 volume command.
Pitch[edit]
- Scale Envelope With Keys: If enabled, the envelopes of higher notes are played more quickly than those of lower notes.
- Key Scale Level: Attenuates the output level of the operators towards higher pitch by the given amount (disabled, 1.5 dB / octave, 3 dB / octave, 6 dB / octave).
- Frequency Multiplier: Multiplies the frequency of the operator with a value between 0.5 (pitched one octave down) and 15.
- Vibrato: If enabled, adds a vibrato effect with a depth of 7 cents.
Waveforms[edit]
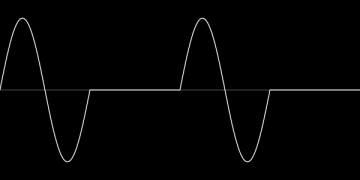
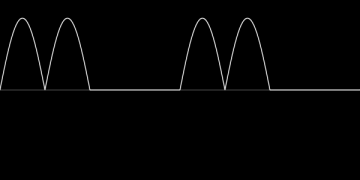
Each operator can use one of the following waveforms:
-
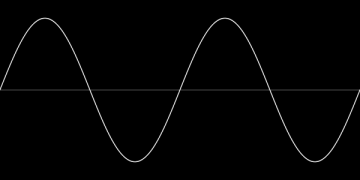 Sine
Sine -
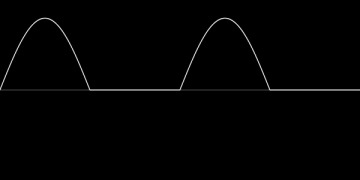 Half Sine
 -
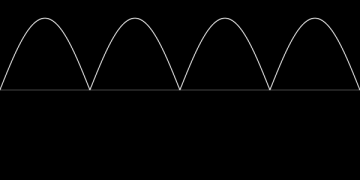 Absolute Sine
 -
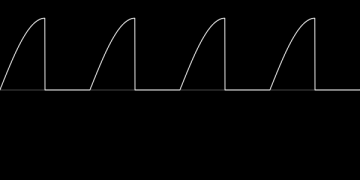 Pulse Sine
 -
 Sine (Even Periods)
 -
 Absolute Sine (Even Periods)
 -
 Square
 -
 Derived Square


Only the first four waveforms (Sine, Half Sine, Absolute Sine and Pulse Sine) are supported by the OPL2 chip, so the remaining four waveforms are not available in S3M modules.
Feedback[edit]
The output of the Modulator can be fed back into itself, creating rich sounds ranging from metallic to noise.